微信小程序APP博客免费开源:taro3+vue3+typescript+nutui3+pnpm+pinia+leancloud
🙂前言
小波原计划是想把廿壴博客做到全平台的覆盖,即PC端响应式 hexo+github+vercel+leancloud,taro3+vue3+leancloud 微信小程序APP,微信公众号h5。
奈何微信小程序个人是无法成功审核通过,那就干脆开源分享出来,有需要的童鞋请自便吧。
暂时因为个人时间原因,todo 的功能会放置晚些时间开发,小波个人测试未发现的 bug 也请能自己搞定尽量自己搞定吧,后续有时间了才能做进一步修复升级,感谢理解。
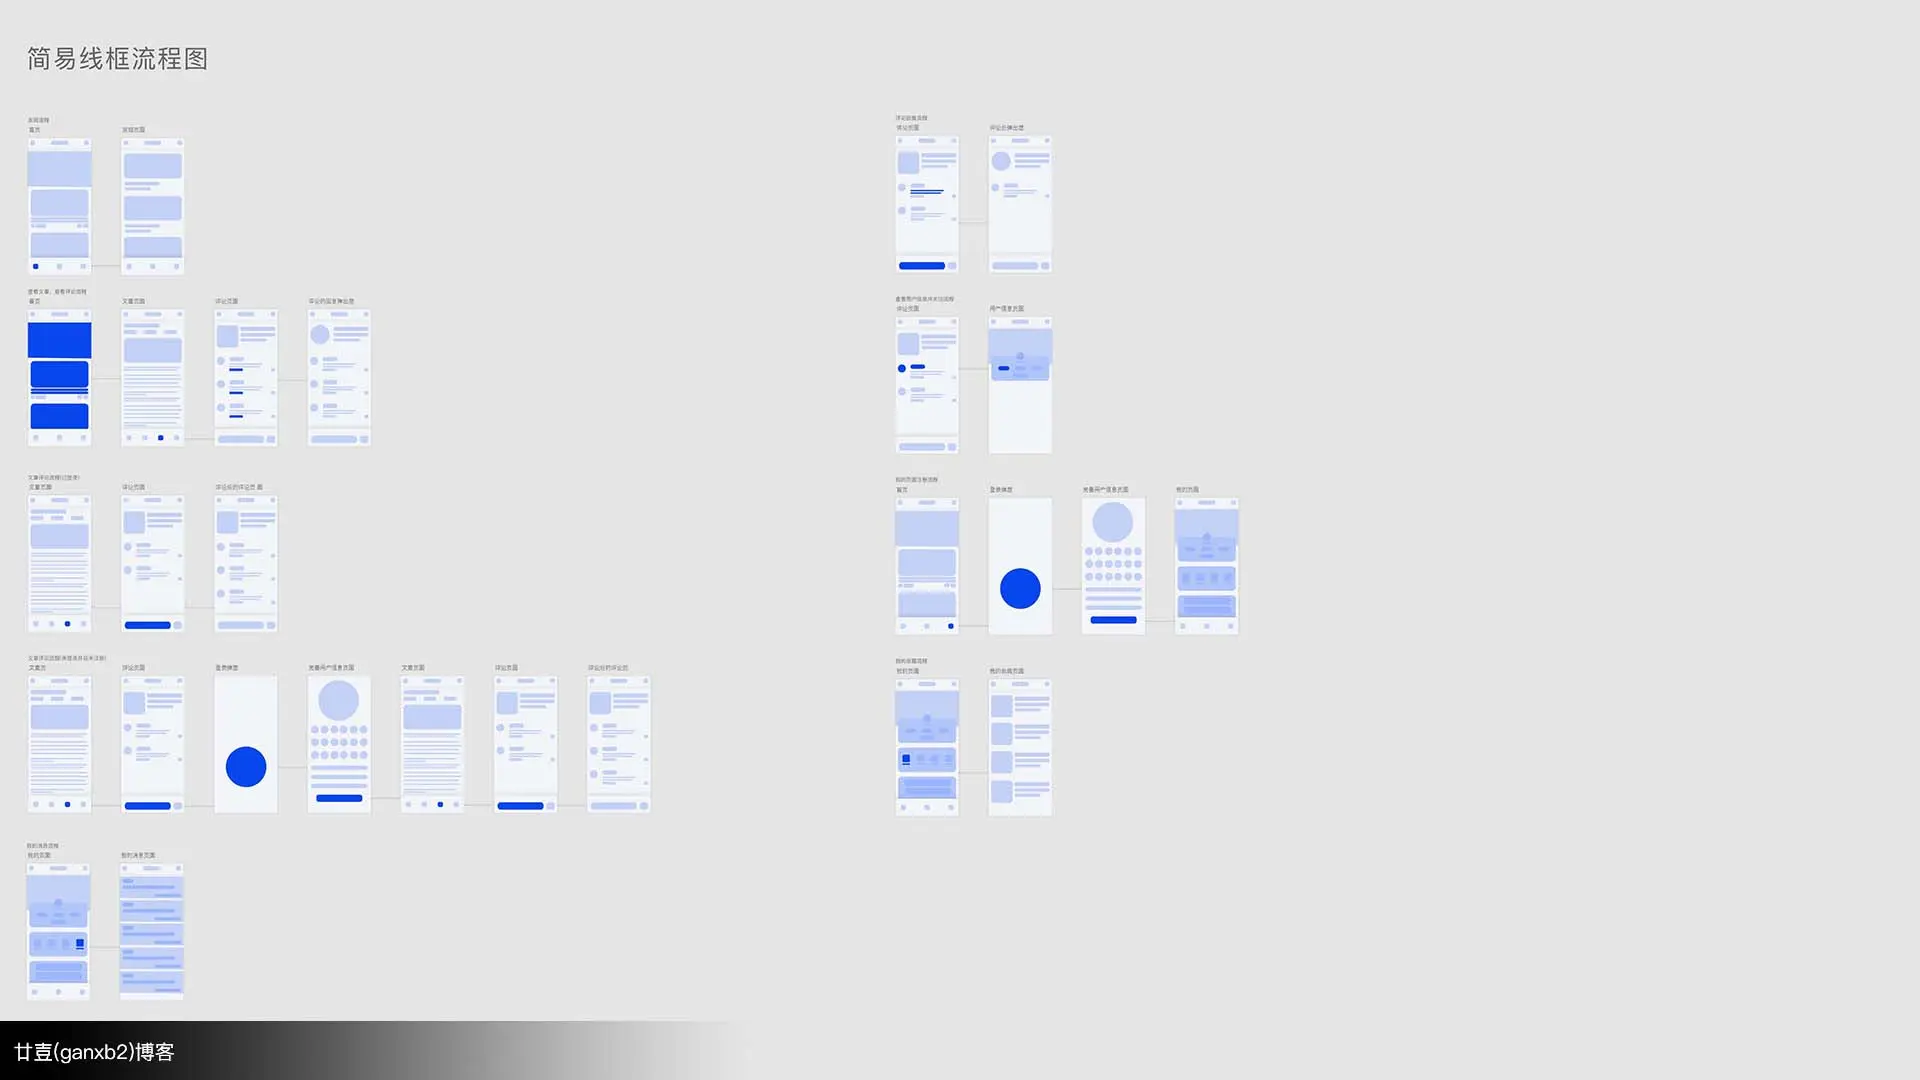
😍廿壴博客微信小程序APP(taro3+vue3+tsx)成品效果


廿壴博客微信小程序APP在线体验版,需要体验的童鞋可以联系小波
– 因为微信小程序需要加一下体验成员才能直接扫码在线访问

🙂总纲
- 微信小程序篇
- taro篇
- leancloud篇
- typescript篇
- nutui3篇
- pinia篇
- pnpm篇
- tsx/jsx篇
- webpack篇
😦目标功能
done:
- 集成 vue3、typescript、pinia,使用 tsx 语法开发
- pnpm 软件包管理
- 多成员代码检查和格式优化
- pinia 全局状态管理
- 小程序分包配置
- ios样式兼容,多行文本样式封装
- 小程序自定义顶部导航
- 用户关注粉丝
- 用户注册登录
- 用户文章评论
- 用户评论回复
- 用户评论等级
- 用户消息提示
- 我的页面用户照片墙更换
- 文章点赞,收藏,访问统计
- 页面:发现,首页,我的,友链,联系,商务合作,查看授权,个人隐私,用户信息
todo:
- 改成更友好的的配置方式初始项目
- 用户的浏览历史
- 用户投稿
- 文章打赏
- 用户信息更改
🧐主要技术栈
一方面是为了把廿壴博客做全平台覆盖,另一方面则是为了把 vue3+tsx+pinia+pnpm 玩一玩。
- taro3
- vue3
- typescript(tsx)
- nutui3
- pinia
- pnpm
- leancloud
- webpack5
🤔搭建微信小程序APP博客架构步骤
第一步:安装 vscode 插件和微信开发工具
vscode 插件
eslint
prettier
volar(ts版本也可一并安装)
sass
以上的插件可以在 vue volar extension pack 中直接全装
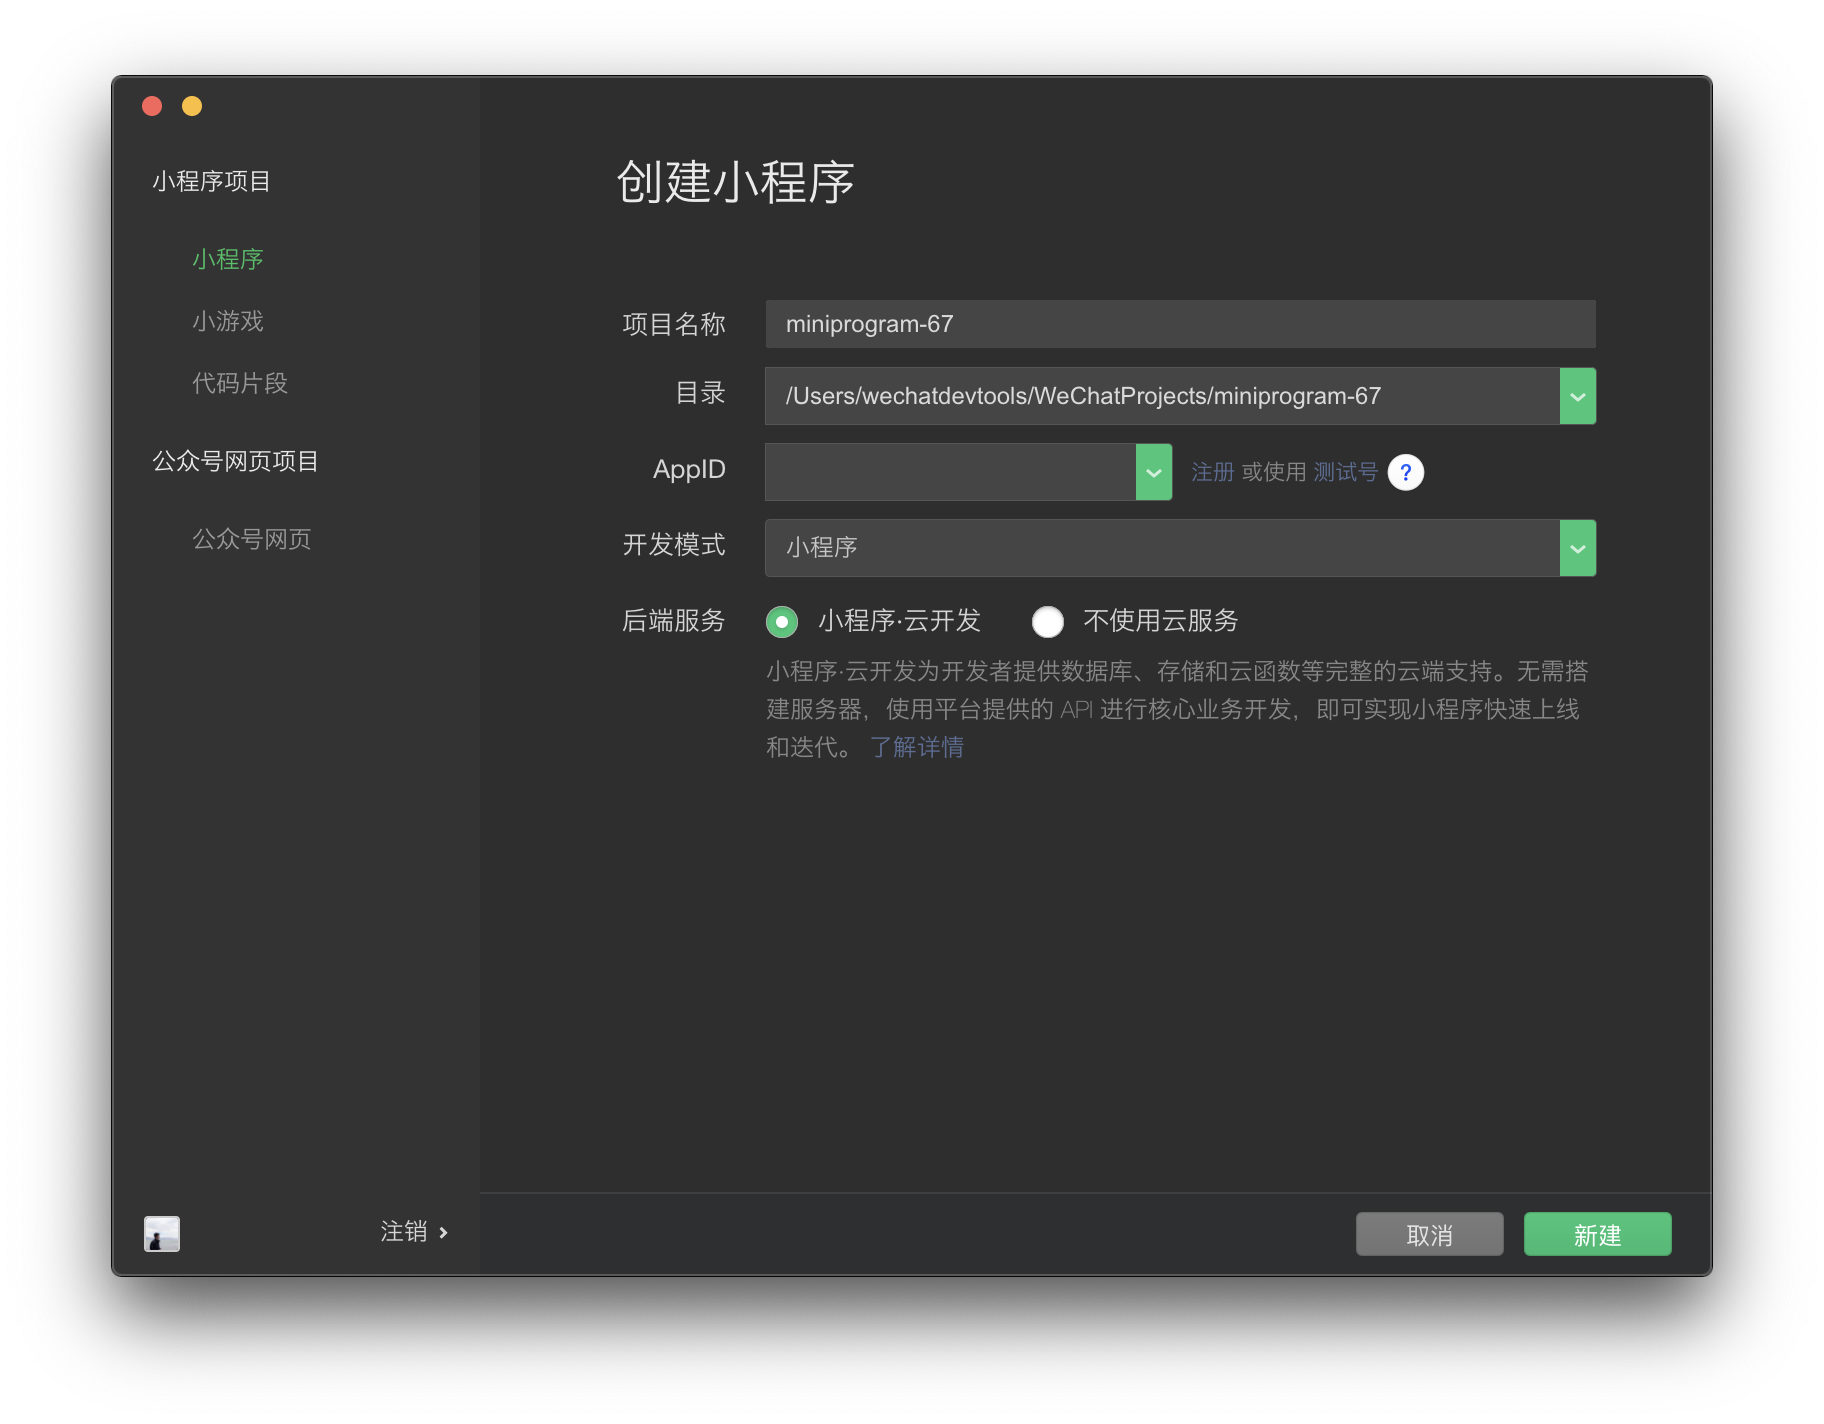
小程序帐号注册,获取的 AppID 并导入本地的项目
第二步:安装 pnpm 和 taro3-cli 脚手架
安装 pnpm
1
2
3
4
5
6
// 全局安装
npm install pnpm -g
// 切换淘宝源
pnpm config set registry https://registry.npmmirror.com/
// 查看源
pnpm config get registry提示
pnpm 跟 npm 和 yarn 的差距就是把原来每个项目安装 modules 放到统一的文件夹中,通过符号链接(软连接)和硬链接,注意项目要和统一放的 modules 同盘,不然就等于丢失了 pnpm 的优势。
安装 taro3-cli 脚手架(参考官网文档[14])
1
2
3
4
5
6
// 全局安装
pnpm add -g @tarojs/cli
// 查看
npm info @tarojs/cli
// 如果安装过程出现sass相关的安装错误
pnpm add -g mirror-config-china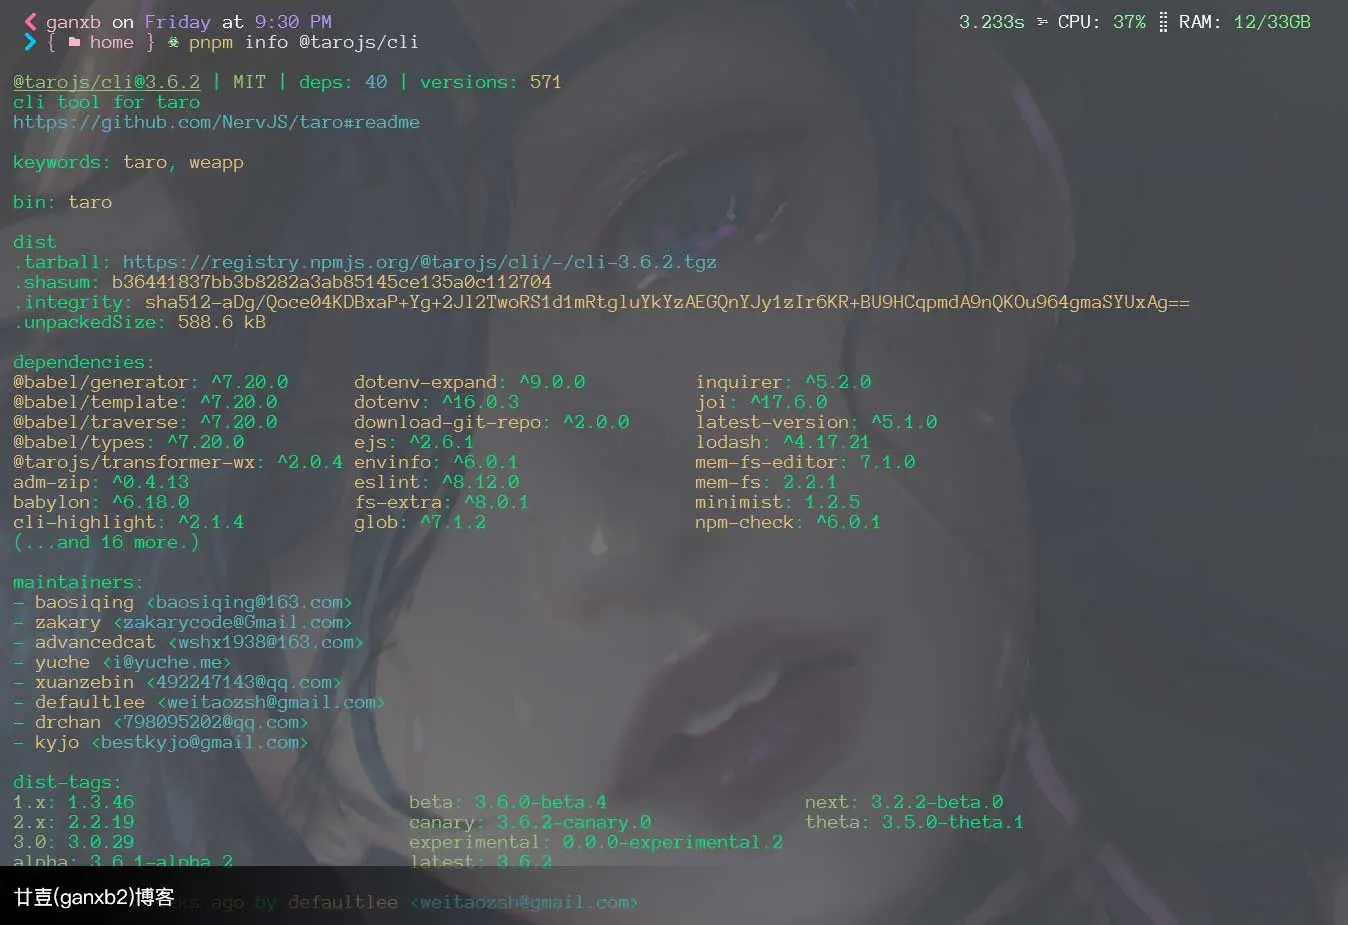
第三步:初始项目
切到 pnpm 设置存包的同盘符执行初始命令
1
2
3
4
5
6
7
8
9
10
11
12
cd x:/
taro init myApp
请输入项目介绍 廿壴
? 请选择框架 Vue3
? 是否需要使用 TypeScript ? Yes
? 请选择 CSS 预处理器(Sass/Less/Stylus) Stylus
? 请选择编译工具 Webpack5
? 请选择包管理工具 pnpm
? 请选择模板源 Gitee(最快)
✔ 拉取远程模板仓库成功!
? 请选择模板 vue3-pinia(Vue3 + Pinia 模板(https://pinia.esm.dev/))注意
- css 预处理最好选择 sass,因为 nutui3 或者其他移动端组件库都是用的这个来写的样式,也因为这个问题导致小波后面为了解决 sass 问题重新安装 node-sass 和 python2
- 模版可以选择 vue3-nutui ,未测试不知道是否选择这个模版就可以预处理 sass 安装报错的相关问题
初始的
package.json1
2
3
4
5
6
7
8
9
10
11
12
13
14
15
16
17
18
19
20
21
22
23
24
25
26
27
28
29
30
31
32
33
34
35
36
37
38
39
40
41
42
43
44
45
46
47
48
49
50
51
52
53
54
55
56
57
58
59
60
61
62
63
64
65
66
67
68
69
70
71
72
73
74
75{
"name": "myApp",
"version": "1.0.0",
"private": true,
"description": "廿壴",
"templateInfo": {
"name": "vue3-pinia",
"typescript": true,
"css": "stylus"
},
"scripts": {
"build:weapp": "taro build --type weapp",
"build:swan": "taro build --type swan",
"build:alipay": "taro build --type alipay",
"build:tt": "taro build --type tt",
"build:h5": "taro build --type h5",
"build:rn": "taro build --type rn",
"build:qq": "taro build --type qq",
"build:quickapp": "taro build --type quickapp",
"dev:weapp":"set NODE_ENV=production && npm run build:weapp -- --watch",
"dev:swan": "npm run build:swan -- --watch",
"dev:alipay": "npm run build:alipay -- --watch",
"dev:tt": "npm run build:tt -- --watch",
"dev:h5": "npm run build:h5 -- --watch",
"dev:rn": "npm run build:rn -- --watch",
"dev:qq": "npm run build:qq -- --watch",
"dev:quickapp": "npm run build:quickapp -- --watch"
},
"browserslist": [
"last 3 versions",
"Android >= 4.1",
"ios >= 8"
],
"author": "",
"license": "MIT",
"dependencies": {
"@babel/runtime": "^7.7.7",
"@tarojs/components": "3.5.7",
"@tarojs/helper": "3.5.7",
"@tarojs/plugin-platform-weapp": "3.5.7",
"@tarojs/plugin-platform-alipay": "3.5.7",
"@tarojs/plugin-platform-tt": "3.5.7",
"@tarojs/plugin-platform-swan": "3.5.7",
"@tarojs/plugin-platform-jd": "3.5.7",
"@tarojs/plugin-platform-qq": "3.5.7",
"@tarojs/router": "3.5.7",
"@tarojs/runtime": "3.5.7",
"@tarojs/shared": "3.5.7",
"@tarojs/taro": "3.5.7",
"@tarojs/taro-h5": "3.5.7",
"@tarojs/plugin-framework-vue3": "3.5.7",
"vue": "^3.2.24",
"pinia": "^2.0.10"
},
"devDependencies": {
"@babel/core": "^7.8.0",
"@tarojs/cli": "3.5.7",
"@tarojs/webpack5-runner": "3.5.7",
"@types/webpack-env": "^1.13.6",
"@typescript-eslint/eslint-plugin": "^5.20.0",
"@typescript-eslint/parser": "^5.20.0",
"@vue/babel-plugin-jsx": "^1.0.6",
"@vue/compiler-sfc": "^3.0.0",
"babel-preset-taro": "3.5.7",
"css-loader": "3.4.2",
"eslint": "^8.12.0",
"eslint-config-taro": "3.5.7",
"eslint-plugin-vue": "^8.0.0",
"style-loader": "1.3.0",
"stylelint": "9.3.0",
"typescript": "^4.1.0",
"vue-loader": "^17.0.0",
"webpack": "5.69.0",
}
}和小波已经搭建好的项目
package.json差异的引入包1
2
3
4
5
6
7
8
9
10
11
12
13
14
15
16
17
18
19
20
21
22
23
24
25
26
27
28
29
30
31
32"dependencies": {
// nutui
"@nutui/nutui-taro": "3",
// nutui相关文件引入插件
"@tarojs/plugin-html": "^3.5.12",
},
"devDependencies": {
// sass插件
"@tarojs/plugin-sass": "^2.2.10",
// esline for prettier
"@vue/eslint-config-prettier": "^7.0.0",
// esline for typescript
"@vue/eslint-config-typescript": "^11.0.2",
// 编译过程中将 import 语句自动转换为按需引入的方式
"babel-plugin-import": "^1.13.6",
// 压缩资源,生成.gz文件
"compression-webpack-plugin": "^10.0.0",
// esline for prettier
"eslint-plugin-prettier": "^4.2.1",
// git提交钩子代码校验
"husky": "^8.0.2",
// 京东凹凸实验室打造的类 React 前端框架
"nervjs": "^1.5.0",
// 挂载sass插件
"node-sass": "^8.0.0",
// 代码格式美化插件
"prettier": ">=2.0.0",
// vue for typescript校验
"vue-tsc": "^1.0.9",
// webpack分包插件
"webpack-bundle-analyzer": "^4.7.0"
}初始的文件树
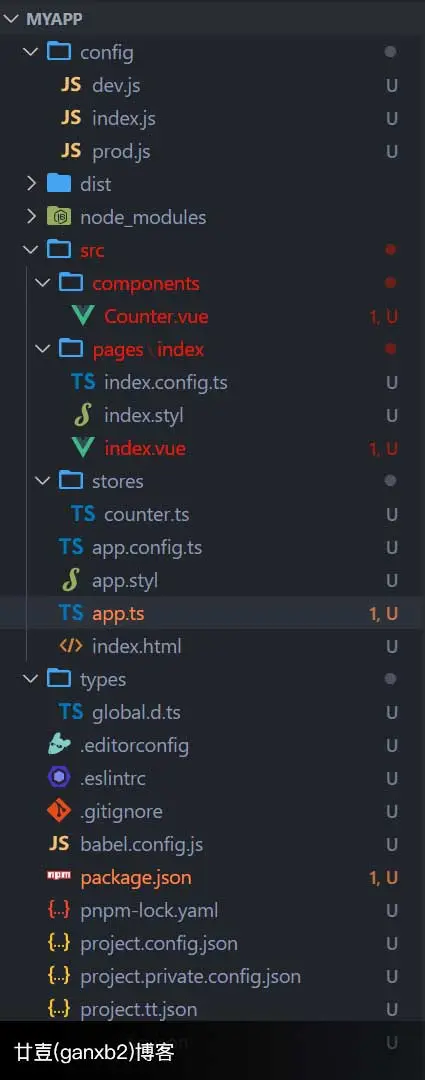
和小波已经搭建好的项目文件树的差异
1
2
3
4
5
6
7
8
9
10
11
12
13
14
15
16
17
18
19
20
21
22
23
24
25
26
27
28
29
30
31
32
33
34
35
36
37
38
39
40
41
42
43
44
45
46
47
48
49
50
51
52taro-vue3
├─ config
│ ├─ dev.js 开发时配置
│ ├─ index.js 默认配置
│ └─ prod.js 打包时配置
├─ src
│ ├─ assets 静态资源
│ ├─ components 组件文件夹
│ │ └─ Counter.vue
│ ├─ libs 库文件夹
│ ├─ pages 页面
│ │ └─ index
│ │ ├─ libs 分包使用的插件库文件
│ │ ├─ types 分包使用的ts申明
│ │ ├─ section
│ │ │ └─ useBanner.tsx 页面模块(业务逻辑跟着模块走)
│ │ ├─ data.ts 分包使用的数据常量
│ │ ├─ index.config.ts 页面配置(小程序默认)
│ │ ├─ index.styl 页面样式(小程序默认)
│ │ └─ index.vue 页面主页(小程序默认)
│ │ └─ useindex.tsx tsx入口
│ ├─ stores pinia状态管理文件夹
│ │ └─ counter.ts
│ ├─ utils
│ │ └─ createApp.ts 入口配置
│ │ └─ deta.ts 全局常量
│ │ └─ nutPlguin.ts nutui组件导入
│ │ └─ utils.ts 公共工具类方法
│ ├─ app.config.ts 小程序进行全局配置
│ ├─ app.styl 小程序全局样式
│ ├─ app.ts 入口页面js
│ └─ index.html 入口页面html
├─ types
│ └─ global.d.ts ts全局申明
├─ .editorconfig 多人协作维护一致的编码风格(初始时生成,其配置可覆盖vscode本地配置)
├─ .eslintrc taro初始默认esline配置文件
├─ .eslintrc.js 小波增加的esline配置文件
├─ .gitignore git忽略配置
├─ .npmrc npm镜像地址
├─ .prettierrc prettier代码格式美化配置
├─ babel.config.js babel配置
├─ LICENSE
├─ package.json 项目配置,依赖
├─ pnpm-lock.yaml pnpm配置
├─ project.config.json 微信小程序项目配置 project.config.json
├─ project.private.config.json对应上面project.config.json的私有配置
├─ project.tt.json 字节跳动小程序项目配置 project.tt.json
├─ README.en.md
├─ README.md
├─ .husky git自动检测
└─ tsconfig.json TypeScript 配置启动命令
1
pnpm dev:weapp
第四步:设置代码规范
标准三件套
- 代码规范 ESlint
- 代码格式化 Prettier
- 提交前检查 husky
安装依赖(批量操作)
1
pnpm add @vue/eslint-config-prettier @vue/eslint-config-typescript eslint-plugin-prettier vue-tsc husky -D设置代码规范和格式化规则
创建
.eslintrc.js并贴入以下代码1
2
3
4
5
6
7
8
9
10
11
12
13
14
15
16
17
18
19
20
21
22
23
24
25
26
27
28
29
30
31
32
33
34
35
36
37module.exports = {
root: true,
env: {
node: true,
'vue/setup-compiler-macros': true
},
parser: 'vue-eslint-parser',
extends: [
'plugin:vue/base',
'plugin:vue/vue3-essential',
'eslint:recommended',
'@vue/prettier',
'@vue/typescript'
],
parserOptions: {
parser: '@typescript-eslint/parser'
},
rules: {
'endOfLine': 'auto',
'prettier/prettier': [
'error',
{
singleQuote: true,
semi: false,
trailingComma: 'none',
arrowParens: 'avoid',
printWidth: 100
}
],
'no-console': process.env.NODE_ENV === 'production' ? 'warn' : 'off',
'no-debugger': process.env.NODE_ENV === 'production' ? 'warn' : 'off',
//在rules中添加自定义规则
//关闭组件命名规则
'vue/multi-word-component-names': 'off'
}
}创建
.prettierrc并贴入以下代码1
2
3
4
5
6
7
8
9
10
11
12
13
14
15
16{
// 缩进2
"tabWidth": 2,
// 使用单引号
"singleQuote": true,
// 末尾添加分号
"semi": false,
// 在对象或数组最后一个元素后面是否添加逗号
"trailingComma": "none",
// 箭头函数参数只有一个时是否要有小括号 avoid: 省略括号
"arrowParens": "avoid",
// 结尾是 \n \r \n\r auto
"endOfLine": "auto",
// 超过最大值换行
"printWidth": 100
}在
package.json中 script 添加 Ts 检查命令和 Eslint 检查命令1
2
3
4"scripts":{
"tsc": "vue-tsc --noEmit --skipLibCheck",
"lint": "eslint --ext .vue --ext .js --ext .ts src/"
}添加 husky 触发 Git 钩子,代码提交前检查
1
pnpm husky install编辑
pre-commit执行 Eslint 检查和 Ts 检查1
2
3
4
5
6
7
8
9
10#!/bin/sh
. "$(dirname "$0")/_/husky.sh"
echo "---eslint start---"
npm run lint
echo "---eslint end---"
echo "---ts lint start---"
npm run tsc
echo "---ts lint end---"提示
小波只引入了插件包,并未亲自测试,有需要的童鞋自己参考文档添加,或者参考 husky 官方仓库文档,晚些时间小波会更新版本加上
代码书写规范,请参考taro官方文档[14]
- 组件名遵从小程序规范(全小写,kebab-case)。
- 组件属性遵从小程序规范(全小写,kebab-case)。
- Boolean 值的组件属性需要显式绑定为 true,不支持简写。
- 事件和 Web 端一样。在事件回调函数中,第一个参数是事件对象,回调中调用 stopPropagation 可以阻止冒泡。
- 使用 @ 修饰符(或 v-on:,更多用法可以参考Vue文档)替代小程序事件名中的 bind(替代支付宝小程序事件名中的 on)。
- Vue 中点击事件使用 @tap。
- 事件名称一般遵循组件属性规范(全部小写)。
- 在 vue@3.0.6 或之后版本使用 JSX 时,事件名遵循 onCamelcase 规范,例如 onGetphonenumber。具体原因可参考 #8796。
其它限制
tsx 代码格式风格
1
2
3
4
5
6
7
8
9
10
11
12
13
14
15
16
17
18
19
20
21
22
23
24
25
26
27
28
29
30
31
32
33
34
35
36
37
38import vue
import hook
import data/css/types
export const useIndex = () => {
// 全局变量&公共常量
// 获取系统相关信息
const customGlobalData = inject<CustomGlobalDataType>('$customGlobalData')
/**
* 定义页面变量
* @object state 页面双向对象集合
*/
const state: type = reactive({})
/**
* 定义方法
*
*/
const handleFun = (): void => {}
/**
* 引入子模块并给hook传值
* @topplaceholderHook 头部占位符高度 = topbarHook
*/
const topplaceholderHook: () => JSX.Element = useTopPlaceholder(customGlobalData)
/**
* 调用
*/
handleFun()
return () => (
<view></view>
)
}
第五步:引入 nutui 移动端组件库
由于小波 taro 初始配置时模版并未选择 vue3-NutUI ,所以需要自己单独命令安装,也可参考 nutui 官方文档[2]
安装 nutui
1
pnpm add @nutui/nutui-taro安装 taro 插件 @tarojs/plugin-html
1
pnpm add @tarojs/plugin-html配置 nutui 375 尺寸
config/index.js1
2
3
4
5
6
7
8
9
10
11
12
13
14
15
16
17config = {
// ...
plugins: ['@tarojs/plugin-html']
// 给 sass-loader 传递选项 !!!! 按需加载方式必须配置
sass: {
// data: `@import "@nutui/nutui-taro/dist/styles/variables.scss";`
data: `@import "@nutui/nutui-taro/dist/styles/variables-jdt.scss";`
},
// ...
designWidth: 375,
deviceRatio: {
640: 2.34 / 2,
750: 1,
828: 1.81 / 2,
375: 2 / 1
}
}添加按需加载插件
babel-plugin-import 是一款 babel 插件,它会在编译过程中将 import 语句自动转换为按需引入的方式。
安装
1
pnpm add babel-plugin-import --save-dev配置
.babelrc或babel.config.js中添加1
2
3
4
5
6
7
8
9
10
11
12
13
14
15
16
17
18
19
20
21
22
23
24
25{
// ...
plugins: [
[
'import',
{
libraryName: '@nutui/nutui-taro',
libraryDirectory: 'dist/packages/_es',
// customName自定义兼容国际化使用
// customName: (name, file) => {
customName: name => {
if (name == 'Locale') {
return '@nutui/nutui-taro/dist/packages/locale/lang'
} else {
return `@nutui/nutui-taro/dist/packages/_es/${name}`
}
},
// style: (name, file) => name.toLowerCase().replace('_es/', '') + '/index.scss',
style: name => name.toLowerCase().replace('_es/', '') + '/index.scss',
camel2DashComponentName: false
},
'nutui3-taro'
]
]
}入口配置中导入组件
1
2
3
4
5
6
7
8
9
10
11
12
13
14
15
16
17
18
19
20
21
22
23
24
25
26
27
28
29
30
31
32
33
34
35
36
37
38
39
40
41
42
43
44
45
46
47
48
49
50
51
52
53
54
55
56
57
58
59import {
Button,
Cell,
CellGroup,
Icon,
Tag,
Tabbar,
TabbarItem,
SearchBar,
Tabs,
TabPane,
Avatar,
AvatarGroup,
Empty,
Skeleton,
Navbar,
Popup,
OverLay,
Grid,
GridItem,
Swiper,
SwiperItem,
TextArea,
// List,
Notify,
NoticeBar,
// Input
// Animate
// Badge,
// 因为项目初始选择了stylus导致sass的变量报错无法使用nutui的布局组件
// Layout,
// Row,
// Col
} from '@nutui/nutui-taro'
App.use(Button)
.use(Cell)
.use(CellGroup)
.use(Icon)
.use(Tag)
.use(Tabbar)
.use(TabbarItem)
.use(SearchBar)
.use(Tabs)
.use(TabPane)
.use(Avatar)
.use(AvatarGroup)
.use(Empty)
.use(Skeleton)
.use(Navbar)
.use(Popup)
.use(OverLay)
.use(Grid)
.use(GridItem)
.use(Swiper)
.use(SwiperItem)
.use(TextArea)
.use(NoticeBar)
.use(Notify)
第六步:分包
小程序分包配置
app.config.ts1
2
3
4
5
6
7
8
9
10
11
12
13
14
15
16
17
18
19
20
21
22
23
24
25
26
27
28
29
30
31
32
33
34
35
36
37
38
39
40
41
42
43
44
45
46
47
48
49
50
51
52
53
54
55
56
57
58
59
60
61
62
63
64
65
66
67
68
69
70// 页面路径列表 String Array
pages: ['pages/index/index'],
// 分包
subpackages: [
{
root: 'pages/user',
pages: ['index']
},
{
root: 'pages/post',
pages: ['index']
},
{
root: 'pages/comment',
pages: ['index']
},
{
root: 'pages/userInfo',
pages: ['index']
},
{
root: 'pages/userNotice',
pages: ['index']
},
{
root: 'pages/userCollect',
pages: ['index']
},
{
root: 'pages/find',
pages: ['index']
},
{
root: 'pages/feedback',
pages: ['index']
},
{
root: 'pages/contact',
pages: ['index']
},
{
root: 'pages/business',
pages: ['index']
},
{
root: 'pages/todo',
pages: ['index']
},
{
root: 'pages/privacy',
pages: ['index']
},
{
root: 'pages/friends',
pages: ['index']
},
// {
// root: 'pages/reward',
// pages: ['index']
// },
// {
// root: 'pages/myadmin',
// pages: ['index']
// },
// {
// root: 'pages/mybooks',
// pages: ['index']
// },
],
// ...提示
- 小程序主包超过 2M,就无法真机预览了,为了提前做好准备在一开始就进行分包处理。(现在开发工具测试时可以把主包大小调整到4M)
- 小程序的主包,包括主页自己使用的相关文件,同时项目主入口挂载的相关文件都会打进主包中,common 全局公共方法也会打进主包
- 分包中使用的公共文件虽然不会打进主包中,但是会在各自分包中生成文件,所以会导致整包大小增加。
使用 webpack 分包
开启taro自带的分包优化
config/index.js1
2
3
4
5
6
7
8
9
10
11
12// ...
// 小程序端专用配置
mini: {
// 可开启智能提取分包依赖插件 by ganxb
optimizeMainPackage: {
enable: true,
exclude: [
// path.resolve(__dirname, '../src/utils/moduleName.js'),
// module => module.resource?.indexOf('pinia') >= 0
]
},
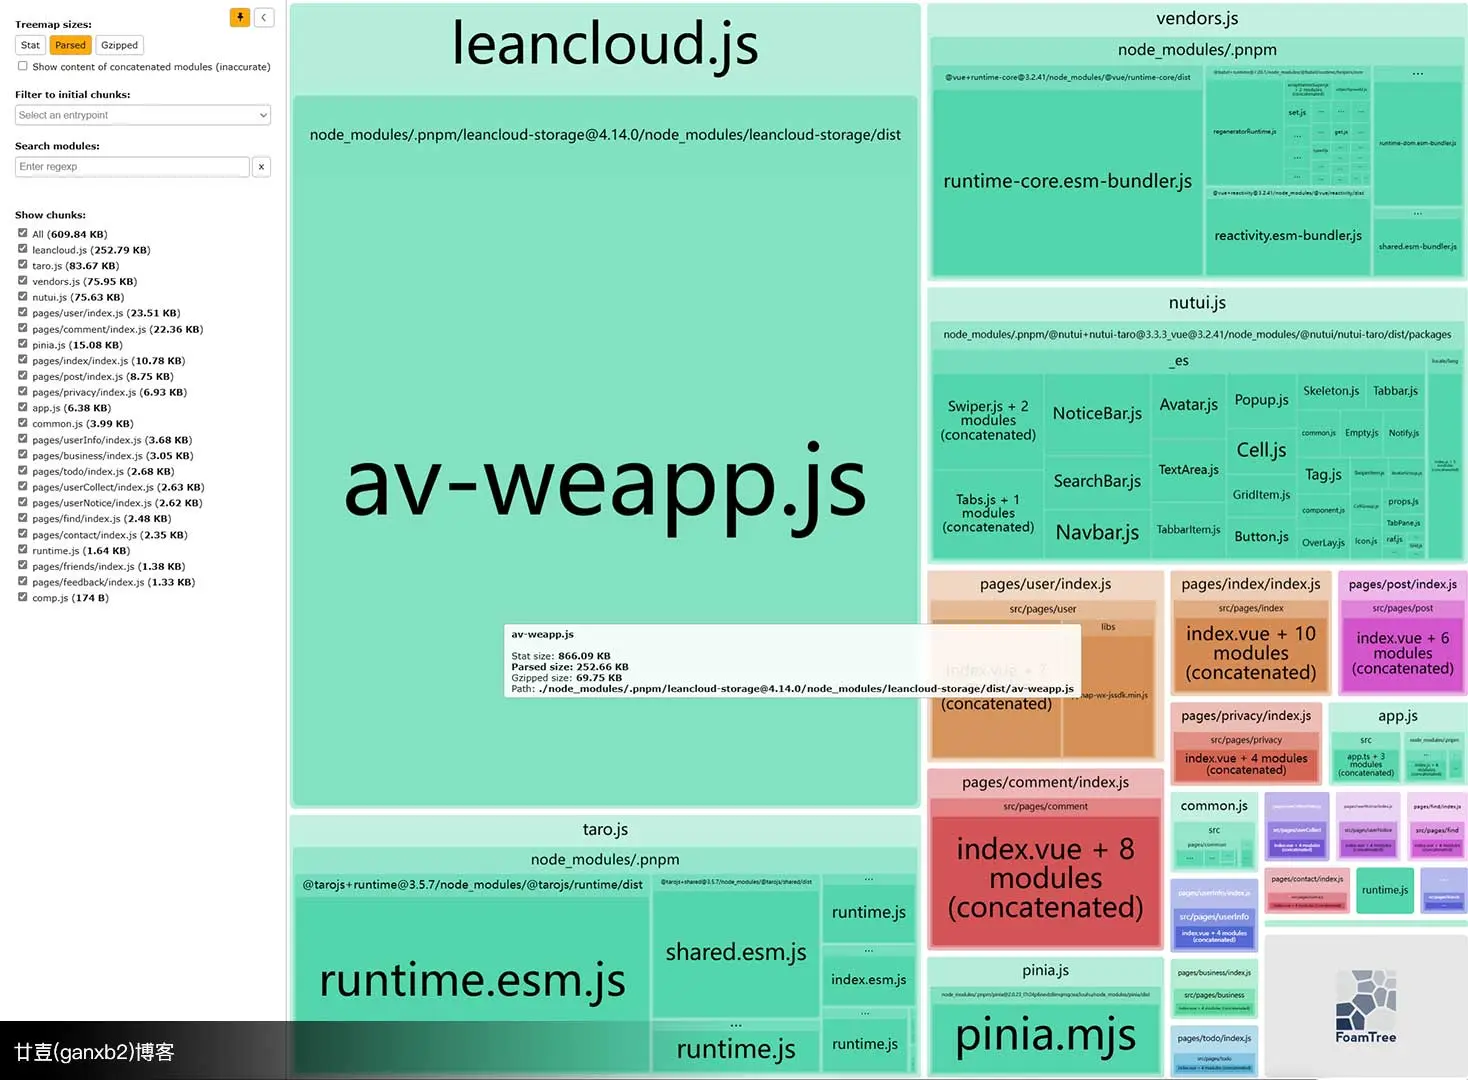
}webpack 分包插件
安装
1
pnpm add webpack-bundle-analyzer -D配置
config/index.js1
2
3
4
5
6
7
8
9
10
11
12
13
14
15
16
17
18
19
20
21
22
23
24
25
26
27
28
29
30
31
32
33
34
35
36
37
38
39
40
41
42
43
44
45
46
47
48
49
50// 引入依赖
const BundleAnalyzerPlugin = require('webpack-bundle-analyzer').BundleAnalyzerPlugin
const config = {
// 小程序端专用配置
mini: {
// 如果这里不配置,只有分包引用的插件会变成无依赖!!!
commonChunks: ['runtime', 'vendors', 'taro', 'common', 'nutui', 'pinia', 'leancloud'],
// 自定义 Webpack 配置
webpackChain(chain, webpack) {
chain.plugin('analyzer').use(BundleAnalyzerPlugin)
chain.merge({
optimization: {
// runtimeChunk: {}
splitChunks: {
cacheGroups: {
vendors: {
name: 'vendors',
minChunks: 2,
test: module => {
return /[\\/]node_modules[\\/]/.test(module.resource)
},
priority: 10
},
nutui: {
name: 'nutui',
test: /[\\/]node_modules[\\/]@nutui[\\/]/,
priority: 15, // 优先级 > vendors的10,故优先优化
enforce: true, // 始终为此缓存组创建chunk 忽略 minSize、minChunks、maxAsyncRequests、maxInitialRequests
reuseExistingChunk: true // 如果当前 chunk 包含已从主 bundle 中拆分出的模块,则它将被重用,而不是生成新的模块。
},
pinia: {
name: 'pinia',
test: /[\\/]node_modules[\\/]pinia[\\/]/,
priority: 20, // 优先级 > vendors的10,故优先优化
enforce: true, // 始终为此缓存组创建chunk 忽略 minSize、minChunks、maxAsyncRequests、maxInitialRequests
reuseExistingChunk: true // 如果当前 chunk 包含已从主 bundle 中拆分出的模块,则它将被重用,而不是生成新的模块。
},
leancloud: {
name: 'leancloud',
test: /[\\/]node_modules[\\/]leancloud-storage[\\/]/,
priority: 25, // 优先级 > vendors的10,故优先优化
// enforce: true, // 始终为此缓存组创建chunk 忽略 minSize、minChunks、maxAsyncRequests、maxInitialRequests
reuseExistingChunk: true // 如果当前 chunk 包含已从主 bundle 中拆分出的模块,则它将被重用,而不是生成新的模块。
}
}
}
},
}
}
}gz 压缩包
安装
1
pnpm compression-webpack-plugin -D配置
config/index.js1
2
3
4
5
6
7
8
9
10
11
12
13
14
15
16
17
18
19
20
21
22
23
24// ...
// 小程序端专用配置
mini: {
// 自定义 Webpack 配置
webpackChain(chain, webpack) {
chain.merge({
plugin: {
install: {
plugin: require('compression-webpack-plugin'),
args: [{
test: /\.(js|css)/,
// filename: '[path].gz[query]',
// FIXME: webpack最新版本必须改成这样 => completed
filename: '[path][base].gz',
algorithm: 'gzip',
threshold: 10240,
minRatio: 0.8
}]
}
},
})
}
}
// ...注意
体验版真机测试 gz 压缩包无法上传,小波不确定如果正式上线版本是否可以。如果不行,可删除该插件包
第七步:安装 leancloud 连接数据库
安装
1 | |
配置
1 | |
调用
1 | |
注意
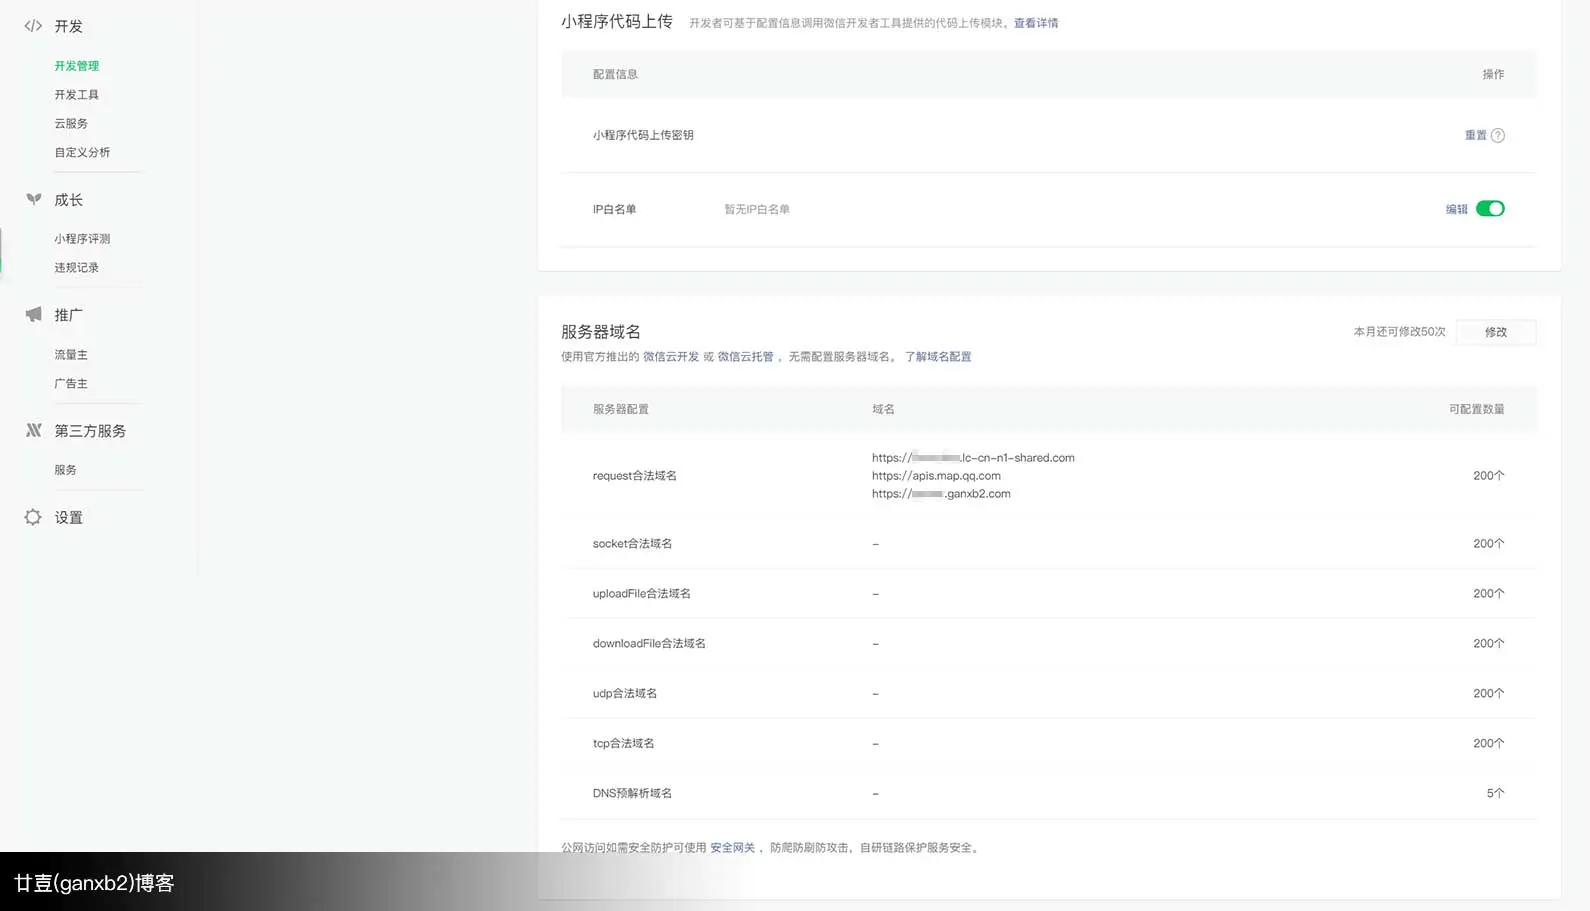
小程序后台管理页面,开发管理–>开发设置–>服务器域名添加 leancloud 和自己 api接口域名(其他开放 api接口都要添加进来,EG:腾讯地图接口)
😚微信小程序IOS优化,代码优化
IOS页脚兼容样式
1
2
3
4
5<!-- html -->
<div class="fix-bottom-bar">
<div class="bottom-bar-content"></div>
</div>1
2
3
4
5
6
7
8
9
10/* css */
.fixed-bottom-bar
height calc(50px + constant(safe-area-inset-bottom)) // 兼容 IOS<11.2
height calc(50px + env(safe-area-inset-bottom)) // 兼容 IOS>11.2
.bottom-bar-content
padding-bottom constant(safe-area-inset-bottom) // 兼容 IOS<11.2
padding-bottom env(safe-area-inset-bottom) // 兼容 IOS>11.2
position fixed
bottom 0
left 0一行超出省略
1
2
3
4
5
6
7
8
9
10/* 一行省略... */
ellipis(fontVal = 16px)
height 22px
color #fff
font-size 16px
text-indent 10px
display inline-block
text-overflow ellipsis
white-space nowrap
overflow hidden多行超出省略
1
2
3
4
5
6
7
8/* 多行省略... */
ellipis-clamp(clampVal = 2, heightVal = 44px)
max-height heightVal
overflow hidden
word-break break-all
display -webkit-box
-webkit-box-orient vertical
-webkit-line-clamp clampValapp.ts入口文件配置和组件挂载拆分1
2
3
4
5
6
7
8
9
10
11
12// 入口配置
import App from './utils/createApp'
// nutUi组件
import './utils/nutPlguin'
import { createPinia } from 'pinia'
// 全局自定义样式
import './app.styl'
App.use(createPinia())
export default Apputils/createApp.ts1
2
3
4
5
6
7
8
9
10
11
12
13
14
15
16
17
18
19
20
21
22
23
24
25
26
27
28
29
30
31
32
33
34
35
36
37
38
39
40
41
42
43
44
45
46
47
48
49
50
51
52
53
54
55
56
57
58
59
60
61
62
63
64
65
66
67
68
69
70
71
72
73
74
75
76
77
78
79
80
81
82
83
84
85
86
87
88
89
90
91
92
93
94
95
96
97
98
99
100
101
102
103
104
105
106
107
108
109
110
111
112
113import { createApp } from 'vue'
import Taro from '@tarojs/taro'
const customGlobalData: CustomGlobalDataType = {
menuButtonInfo: {
bottom: 1,
height: 1,
left: 1,
right: 1,
top: 1,
width: 1
},
systemInfo: {
model: '',
pixelRatio: 0,
windowWidth: 0,
windowHeight: 0,
system: '',
language: '',
version: '',
deviceOrientation: 'portrait',
screenWidth: 0,
screenHeight: 0,
SDKVersion: '',
brand: '',
fontSizeSetting: 0,
benchmarkLevel: 0,
// batteryLevel: 100,
statusBarHeight: 0,
bluetoothEnabled: true,
locationEnabled: true,
wifiEnabled: true,
cameraAuthorized: true,
locationAuthorized: true,
microphoneAuthorized: true,
notificationAuthorized: true,
safeArea: {
top: 47,
left: 0,
right: 390,
bottom: 810,
width: 390,
height: 763
},
platform: 'devtools',
enableDebug: false,
// devicePixelRatio: 3,
// mode: 'default',
theme: 'light'
},
topbarTop: 0,
topbarPaddingR: 0,
topbarBoxHeight: 0,
topbarHeight: 0,
user: ''
}
// leancloud
import AV from 'leancloud-storage/dist/av-weapp.js'
AV.init({
appId: '',
appKey: '',
// 请将 xxx.example.com 替换为你的应用绑定的自定义 API 域名
serverURLs: 'https://.lc-cn-n1-shared.com'
})
const App = createApp({
onLaunch() {
// 第一执行
// console.log('onlaunch----------', Taro.getMenuButtonBoundingClientRect())
// customGlobalData.menuButtonInfo = Taro.getMenuButtonBoundingClientRect()
customGlobalData.menuButtonInfo = Object.assign(
customGlobalData.menuButtonInfo,
Taro.getMenuButtonBoundingClientRect()
)
// 获取接口的数据不要自己转别名,尽量用接口返回参数名
customGlobalData.systemInfo = Taro.getSystemInfoSync()
// 距离顶部的距离 = 胶囊按钮的top
customGlobalData.topbarTop = customGlobalData.menuButtonInfo.top
// topbar盒子高度 = 顶部高度+胶囊按钮高度+胶囊按钮的上下间距
customGlobalData.topbarBoxHeight =
(customGlobalData.systemInfo.statusBarHeight || 0) +
customGlobalData.menuButtonInfo.height +
(customGlobalData.menuButtonInfo.top - (customGlobalData.systemInfo.statusBarHeight || 0)) *
2 || 0
// 右填充:窗口宽度 - 胶囊按钮的左间距 - 10
customGlobalData.topbarPaddingR =
customGlobalData.systemInfo.windowWidth - (customGlobalData.menuButtonInfo.left + 10) || 0
// topbar的高度 = 胶囊高度 + 胶囊的上下间距
customGlobalData.topbarHeight =
customGlobalData.menuButtonInfo.height +
(customGlobalData.menuButtonInfo.top - (customGlobalData.systemInfo.statusBarHeight || 0)) * 2
},
onShow() {
// 第二执行
// console.log('onshow----------')
},
onHide() {
// console.log('onhide----------')
}
// onPullDownRefresh: function (){
// Taro.stopPullDownRefresh()
// }
// 入口组件不需要实现 render 方法,即使实现了也会被 taro 所覆盖
})
// 全局变量
App.provide('$customGlobalData', customGlobalData)
export default Apputils/nutPlguin.ts1
2
3
4
5
6
7
8
9
10
11
12
13
14
15
16
17
18
19
20
21
22
23
24
25
26
27
28
29
30
31
32
33
34
35
36
37
38
39
40
41
42
43
44
45
46
47
48
49
50
51
52
53
54
55
56import App from './createApp'
import {
Button,
Cell,
CellGroup,
Icon,
Tag,
Tabbar,
TabbarItem,
SearchBar,
Tabs,
TabPane,
Avatar,
AvatarGroup,
Empty,
Skeleton,
Navbar,
Popup,
OverLay,
Grid,
GridItem,
Swiper,
SwiperItem,
TextArea,
Notify,
NoticeBar,
// 因为项目初始选择了stylus导致sass的变量报错无法使用nutui的布局组件
// Layout,
// Row,
// Col
} from '@nutui/nutui-taro'
App.use(Button)
.use(Cell)
.use(CellGroup)
.use(Icon)
.use(Tag)
.use(Tabbar)
.use(TabbarItem)
.use(SearchBar)
.use(Tabs)
.use(TabPane)
.use(Avatar)
.use(AvatarGroup)
.use(Empty)
.use(Skeleton)
.use(Navbar)
.use(Popup)
.use(OverLay)
.use(Grid)
.use(GridItem)
.use(Swiper)
.use(SwiperItem)
.use(TextArea)
.use(NoticeBar)
.use(Notify)webpack 打包后生产环境去除 console
config/index.js1
2
3
4
5
6
7
8
9
10
11
12
13
14
15
16
17
18
19const config = {
// ...
// 配置只在生产模式下生效(去除consoloe)
terser: {
enable: true,
config: {
// 配置项同 https://github.com/terser/terser#minify-options
ecma: undefined,
warnings: false,
parse: {},
compress: {
drop_console: true,
drop_debugger: false,
pure_funcs: ['console.log'] // 移除console
}
},
},
// ...
}
😫搭建过程中小波遇见的问题
错误
出现 sass 安装失败提示
报错1
2404 status code downloading 32-bit node.lib
Error: 404 status code downloading 32-bit node.lib报错2
check python checking for Python executable "python2" in the PATH
报错1原因:18 以上的 node 版本 镜像库里没有32-bit 文件夹,安装18版本以下的 node
解决方案:小波换成了 16.13.1
报错2解决方案:
方法1:按官方给的建议执行以下命令后再重新初始安装
1 | |
方法2:只更改 sass 的镜像下载地址或者更改 pnpm 的镜像地址
1 | |
如果以上方法都失败,恭喜你和小波遭遇一样
方法3:打开 powershell 管理员模式执行以下 (项目文件中安装)
安装 window 安装工具
1
2
3pnpm add --global --production windows-build-tools
// 或
pnpm add -g windows-build-tools卸载高版本 node 自带安装的 python3 ,镜像网站下载 python-2.7.5.amd64.msi
1
2
3
4
5
6
7
8UNCAUGHT EXCEPTION This is a bug in `node-gyp`
// command "C:\Program Files\nodejs\node.exe" "C:\myWeb\taro-vue3\node_modules\.pnpm\node-gyp@3.8.0\n
// │ gyp ERR! cwd C:\myWeb\taro-vue3\node_modules.pnpm\node-sass@4.14.1\node_modules\node-sass
// │ gyp ERR! node -v v16.13.1
// │ gyp ERR! node-gyp -v v3.8.0
// │ gyp ERR! This is a bug in node-gyp.
// This is a bug in `node-gyp`. Try to update node-gyp and file an Issue if it does not help解决方法:安装
1
pnpm add -g node-gyp安装 node-sass
1
pnpm add node-sass -D安装 @tarojs/plugin-sass
1
pnpm add @tarojs/plugin-sass -D配置插件
config/index.js1
2
3
4
5
6
7// ...
plugins: [
'@tarojs/plugin-sass', // 使用 Sass
// '@tarojs/plugin-less', // 使用 Less
// '@tarojs/plugin-stylus', // 使用 Stylus
],
// ...
😊直接克隆项目后安装步骤
utils/createApp.ts绑定 leancloud 的 appId,appKey,域名userInfo/useIndex.tsx中 storageLkey 绑定 leancloud 的 appId- 微信小程序后台管理–>开发管理加入自己的 leancloud 域名、腾讯地图 api域名、自己的相应 api域名
pnpm install后pnpm dev:weapp- 微信开发工具勾选 不校验合法域名、web-view(业务域名)、TLS 版本以及 HTTPS 证书
😊来自小波的bilibili视频教程
🙂小波用到的相关参考资料链接

『旅行者』,帮小波关注一波公众号吧。
小波需要100位关注者才能申请红包封面设计资格,万分感谢!
关注后可微信小波,前66的童鞋可以申请专属红包封面设计。


微信
支付宝